6. WebAuthn/FIDO Passwordless: both server and client setup guide
Note: we have originally published this article on our homepage and only later added it to the documentation also.
For a live demo, there is a working version on GitHub.
Please note that this is a tutorial, not a full documentation. To use this in a production environment, please read our FIDO docs also!
6.1. What is WebAuthn?
According to the FIDO Alliance, passwords are the root cause of 80% of data breaches! It is so common, yet so many fall for it… It’s simply time to fix this mess. So, the world is deploying a solution: WebAuthn.
WebAuthn allows you to login to websites using a gesture. For example, a fingerprint, an external authenticator, etc.
The server creates a challenge that the authenticator device signs using the credential. When the server verifies the signature, it can authenticate the user. Usually, the authenticator will require the user to verify their identity using a fingerprint, a pin code or other gesture.
Examples of authenticators include external hardware security keys and your device’s trusted platform module.
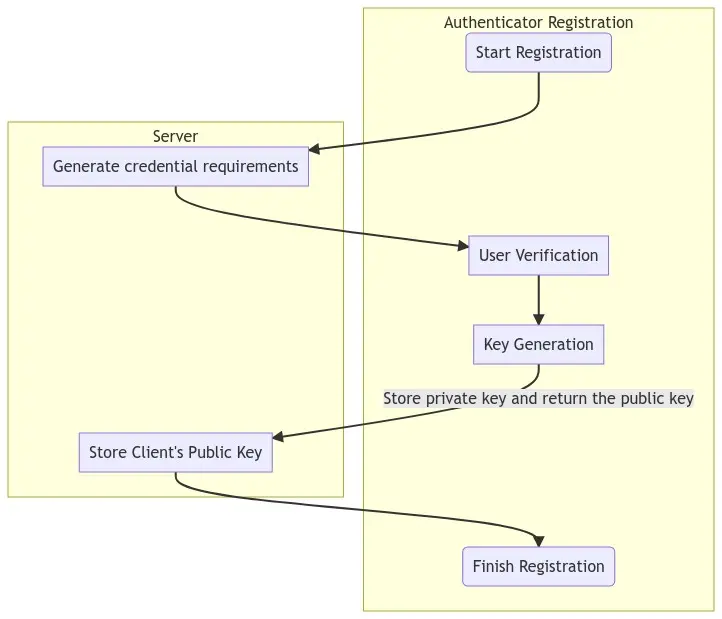
Here is the WebAuthn flowchart. Don’t worry: you don’t need to understand this to use it in your website :-)!
Here is the flowchart for registration:
Here is the flowchart to login:

Because of this mechanism, it is impossible to phish WebAuthn credentials, as they are never released from the authenticator. Only the signed challenge is released, which is not enough to obtain the credentials. Because a large portion of cyberattacks come from breached passwords, this can massively improve your security.
6.2. Setup your environment
Before proceeding, please install Python on your computer. Depending on your system, you may have Python already installed. If not, you can always get the latest version from the Python Homepage!
Next, use the Python package manager (pip) to install Krptn:
pip install krptn
If pip cannot find the wheels, you may need to build Krptn from source. The installation section of our documentation contains instructions.
6.3. Create the client
First, we need some external JS:
<script async src="https://cdn.jsdelivr.net/gh/herrjemand/Base64URL-ArrayBuffer@latest/lib/base64url-arraybuffer.js"></script>
6.3.1. Registration
We need a way to register the credential in the user’s browser, so that the challenge can be signed.
Secondly, we need to obtain the credential’s options from the server. In the next sections, we will discuss how we generate these:
const response = await fetch('/fidoReg', {cache: 'no-cache'});
const options = await response.json();
It is important that the response is decoded:
options.user.id = base64url.decode(options.user.id);
options.challenge = base64url.decode(options.challenge);
if (options.excludeCredentials) {
    for (let cred of options.excludeCredentials) {
        cred.id = base64url.decode(cred.id);
    }
}
And the moment we were all waiting for! We can register the credential with the browser:
const cred = await navigator.credentials.create({
    publicKey: options,
});
Unfortunately, our job is not done… We need to upload the browser’s response to the server. After this, the server will store the credential in the database!
We need to prepare the browser’s response first:
if (cred.response) {
    const clientDataJSON =
        base64url.encode(cred.response.clientDataJSON);
    const attestationObject =
        base64url.encode(cred.response.attestationObject);
    credential.response = {
        clientDataJSON,
        attestationObject,
    };
}
Finally, we are ready to upload the response and finalize the registration.
await fetch('/fidoFinishReg', {
    body: JSON.stringify(credential),
    cache: 'no-cache',
    method: 'POST',
    headers: {'Content-Type': 'application/json'}
});
Again, these mysterious server endpoints will the discussed!
6.3.2. Login
While according to the official WebAuthn website, the user does not need to enter the password, because of Krptn’s Zero Knowledge approach, we will require the user to provide the password anyway.
const email = "EMAIL";
const pwd = "PASSWORD";
First, we need to request the FIDO (WebAuthn) challenge from the server:
const query = {};
query.email = email;
const repsonse = await fetch('/getFidoLogin', // Mysterious endpoints will be discussed
    {cache: 'no-cache',
    method: 'POST',
    headers: {'Content-Type': 'application/json'},
    body: JSON.stringify(query)}
);
const options = await repsonse.json();
Decode:
options.challenge = base64url.decode(options.challenge);
for (let cred of options.allowCredentials) {
    cred.id = base64url.decode(cred.id);
}
Next, we can request the browser to sign the challenge, thereby proving the user’s identity:
const cred = await navigator.credentials.get({
    publicKey: options
});
This response will be uploaded to the server. But first, we need some base64!
const credential = {};
credential.fido = 1;
credential.id = cred.id;
credential.type = cred.type;
credential.rawId = base64url.encode(cred.rawId);

if (cred.response) {
    const clientDataJSON =
        base64url.encode(cred.response.clientDataJSON);
    const authenticatorData =
        base64url.encode(cred.response.authenticatorData);
    const signature =
        base64url.encode(cred.response.signature);
    const userHandle =
        base64url.encode(cred.response.userHandle);
    credential.response = {
        clientDataJSON,
        authenticatorData,
        signature,
        userHandle,
    };
}
Finally, we can upload the response to the server and finish the authentication:
credential.pwd = pwd;
credential.email = email; // These are required by Krptn
authToken = await fetch('/fidoFinishLogin', {
    body: JSON.stringify(credential),
    cache: 'no-cache',
    method: 'POST',
    headers: {'Content-Type': 'application/json'}
});
6.4. Create the server
The following section assumes that the users have already been created in Krptn. You can quickly create them as discussed in the User Auth docs.
This also allows you to take advantage of other extensive security features in Krptn.
In order for WebAuthn to work, you need to set certain configuration options:
1import krypton
2
3krypton.configs.APP_NAME = "ExampleApp" # name of your app
4## The below are only needed for FIDO
5krypton.configs.HOST_NAME = "example.com" # hostname, as seen by the user's browser
6krypton.configs.ORIGIN = "https://example.com/" # again, as seen by the user's browser
HOST_NAME can be set to localhost and ORIGIN can be set to https://localhost for development.
6.4.1. Registration
Inside the /fidoReg endpoint:
1from krypton.auth import users
2
3model = users.standardUser(email)
4key = model.login(...)
5... # Standard Krptn login procedure
6options = model.beginFIDOSetup()
This options needs to be the response sent to the browser.
Inside /fidoFinishReg:
1model.completeFIDOSetup(request_json_string)
Of course, you will have to store the user model in the session.
This is best achieved by setting key, as returned from model.login in a cookie, so that on each request, you can restore the session:
1model = users.standardUser(username_from_cookie)
2model.restoreSession(key_from_cookie)
6.4.2. Login
Inside getFidoLogin:
1model = users.standardUser(email_slash_username)
2options = model.getFIDOOptions()
options needs to be provided in response to the request.
Inside fidoFinishLogin:
1model = users.standardUser(name_email)
2key = user.login(password, fido=fidoChallangeFromBrowser)
As mentioned, key can be set to keep the user authenticated in the session. Please see our User Auth docs for more information.
6.5. Pulling it all together
Depending on which web framework you are using, the client and server side needs to be glued together differently. We have an example where it is glued together with Flask on GitHub.
Last, but certainly not least, after creating a GUI where the user can enter the email and password, you are ready!
6.6. Full Code and wrap up
Note
In order for this section to make sense, please read User Auth first.
To see WebAuthn with Krptn implemented in action, you can have a look at our Flask example on GitHub.
First make sure that the required configuration options for FIDO are set (app name, origin).
Currently, we only support passwordless as a second (or third) authentication factor. The password still has to be enabled.
For security reasons, we can only have one FIDO credential registered. To remove the FIDO credential:
For convention,model will be the current user’s user model (that is, standardUser object). It is your task to retrieve the model using user sessions.
1model.removeFIDO()
6.6.1. Register
1options = model.beginFIDOSetup()
The above code generates options for FIDO. Please send these to the client’s browser. In the browser, please run the following JS:
<!---
    This code was taken from Google's WebAuthn Glitch Tutorial: https://glitch.com/edit/#!/webauthn-codelab-start?path=README.md%3A1%3A0
    This code was changed to work with Krypton's Auth Backends. These include changing auth URLs, loading JSON data.

    Here is the original copyright notice:

    Copyright 2019 Google Inc. All rights reserved.

    Licensed under the Apache License, Version 2.0 (the "License");
    you may not use this file except in compliance with the License.
    You may obtain a copy of the License at

        https://www.apache.org/licenses/LICENSE-2.0

    Unless required by applicable law or agreed to in writing, software
    distributed under the License is distributed on an "AS IS" BASIS,
    WITHOUT WARRANTIES OR CONDITIONS OF ANY KIND, either express or implied.
    See the License for the specific language governing permissions and
    limitations under the License
--->
<script async src="https://cdn.jsdelivr.net/gh/herrjemand/Base64URL-ArrayBuffer@latest/lib/base64url-arraybuffer.js"></script>
<script>
    async function register() {
        const response = await fetch('/fidoReg', {cache: 'no-cache'}); // /fidoReg should return FIDO options as generated above
        const options = await response.json();

        options.user.id = base64url.decode(options.user.id);
        options.challenge = base64url.decode(options.challenge);

        if (options.excludeCredentials) {
            for (let cred of options.excludeCredentials) {
                cred.id = base64url.decode(cred.id);
            }
        }

        const cred = await navigator.credentials.create({
            publicKey: options,
        });

        const credential = {};
        credential.id = cred.id;
        credential.rawId = base64url.encode(cred.rawId);
        credential.type = cred.type;

        if (cred.response) {
            const clientDataJSON =
                base64url.encode(cred.response.clientDataJSON);
            const attestationObject =
                base64url.encode(cred.response.attestationObject);
            credential.response = {
                clientDataJSON,
                attestationObject,
            };
        }
        localStorage.setItem('KryptonFIDOcredId', credential.id);
        return await fetch('/fidoFinishReg', { // See below what /fidoFinishReg should do
            body: JSON.stringify(credential),
            cache: 'no-cache',
            method: 'POST',
            headers: {'Content-Type': 'application/json'}
        });
    }
</script>
Please see our tutorial for more details on the above code.
Inside /fidoFinishReg (or however you rename it):
1import json
2model.completeFIDOSetup(json.dumps(request.get_json()["credentials"])) # Of course, depending on your web framework this will differ
6.6.2. Login
First of all, we need to obtain our FIDO options:
1options = model.getFIDOOptions()
These will need to be transmited to the browser, and the result (returned from the browser) of the authentication should be passed to login function:
1model.login(pwd='MyPWD', fido=fidoResponse) # fidoResponse, is the stringified JSON from the browser.
On failure, a krypton.auth.users.bases.UserError will be raised and model.FIDORequired will be set to True.
To obtain authentication result in the browser:
<!---
    Some of this code was taken from Google's WebAuthn Glitch Tutorial: https://glitch.com/edit/#!/webauthn-codelab-start?path=README.md%3A1%3A0
    This code was changed to work with Krypton's Auth Backends. These include changing auth URLs, loading JSON data.

    Here is the original copyright notice:

    Copyright 2019 Google Inc. All rights reserved.

    Licensed under the Apache License, Version 2.0 (the "License");
    you may not use this file except in compliance with the License.
    You may obtain a copy of the License at

        https://www.apache.org/licenses/LICENSE-2.0

    Unless required by applicable law or agreed to in writing, software
    distributed under the License is distributed on an "AS IS" BASIS,
    WITHOUT WARRANTIES OR CONDITIONS OF ANY KIND, either express or implied.
    See the License for the specific language governing permissions and
    limitations under the License
--->
<script async src="https://cdn.jsdelivr.net/gh/herrjemand/Base64URL-ArrayBuffer@latest/lib/base64url-arraybuffer.js"></script>
<script>
    async function doFido() {
        const email = document.getElementsByName('email')[0].value; // Replace with your password form
        const pwd = document.getElementsByName('password')[0].value; // Replace with your password form
        const query = {}
        query.email = email;

        // To the below request, please return the response from model.getFIDOOptions()
        // Don't forget to replace your endpoint
        const repsonse = await fetch('/getFidoLogin', // Replace endpoint with yours
            {cache: 'no-cache',
            method: 'POST',
            headers: {'Content-Type': 'application/json'},
            body: JSON.stringify(query)}
        );

        const options = await repsonse.json();

        options.challenge = base64url.decode(options.challenge);

        for (let cred of options.allowCredentials) {
            cred.id = base64url.decode(cred.id);
        }
        const cred = await navigator.credentials.get({
            publicKey: options
        });

        const credential = {};
        credential.fido = 1;
        credential.id = cred.id;
        credential.type = cred.type;
        credential.rawId = base64url.encode(cred.rawId);

        if (cred.response) {
            const clientDataJSON =
                base64url.encode(cred.response.clientDataJSON);
            const authenticatorData =
                base64url.encode(cred.response.authenticatorData);
            const signature =
                base64url.encode(cred.response.signature);
            const userHandle =
                base64url.encode(cred.response.userHandle);
            credential.response = {
                clientDataJSON,
                authenticatorData,
                signature,
                userHandle,
            };
        }
        const finalCredentials = JSON.stringify(credential);
        // Please pass the stringified JSON `finalCredentials` as the `fido` parameter to the `login` function.
        // You still need to provide the user's password to the funcion also.
    }
</script>
6.7. Copyright
Throughout the tutorial, we used some code from Google’s tutorial on FIDO. This code is in the client side where we decode/encode the credentials.
Here is the original, Google’s, copyright notice:
Copyright 2019 Google Inc. All rights reserved.

Licensed under the Apache License, Version 2.0 (the "License");
you may not use this file except in compliance with the License.
You may obtain a copy of the License at

    https://www.apache.org/licenses/LICENSE-2.0

Unless required by applicable law or agreed to in writing, software
distributed under the License is distributed on an "AS IS" BASIS,
WITHOUT WARRANTIES OR CONDITIONS OF ANY KIND, either express or implied.
See the License for the specific language governing permissions and
limitations under the License